
Using regularly EqAscom to drive our EQ6 mount, we found the necessity to move the telescope in an easy way without having to use the PC keyboard or mouse. Since EqAscom can use a joystick to do this, we realized a dedicated joystick.
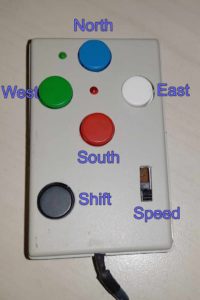
The joystick with the key functions
Mode of operation
In addition to the standard four movement keys (North, South, East and West) there is a Shift key for additional functions and a slider to choose the telescope speed.
The keyboard will automatically lock after remaining idle for 2 minutes, indicating the locked state with the red led and a short beep-beep. To unlock, press the Shift key for 2 seconds. A single Beep and the green led will indicate that the keyboard is now unlocked.
During regular operation, pressing and holding Shift together with South will trigger the “emergency stop” function. Since in Eqmod the emergency stop is also a Park, you will lose the mount alignment. To work around this, Shift-South (emergency stop) will be automatically followed by Shift-West (which should be programmed as “UNPARK”) and Shift-North (which should be programmed as “SIDEREAL SPEED”).
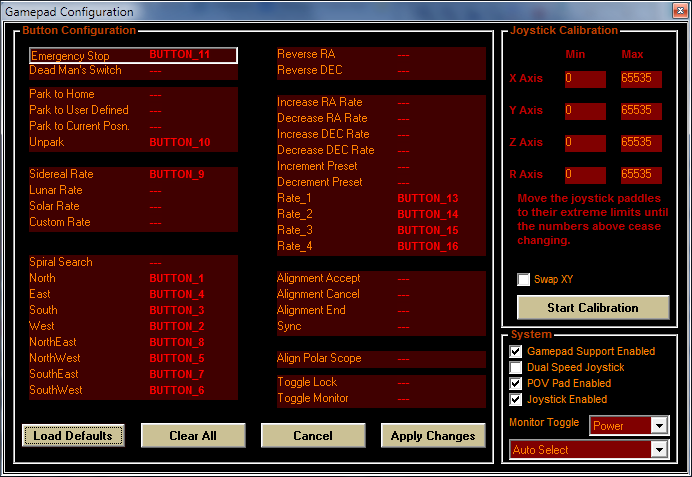
EqMod “Gamepad Configuration” page
To be able to configure the North-East, North-West, South-East, South-West and the Emergency Stop functions in the “Gamepad Configuration” dialog in EqMod, there is a “special operating mode” of the joystick where the single North/South/East/West directions are ignored (and therefore you will not end up programming the wrong function while pressing or releasing two keys) and the Shift-South function (“emergency stop”) will be sent as a single button and not be followed by Shift-North and Shift-West. This “special operating mode” can be entered by unlocking the joystick with the South button instead of the regular Shift button (it takes longer to unlock) and will be indicated with a flashing red led. To exit, wait for the keyboard to lock and unlock normally.
Keyboard functions
| Key | Joystick button | Function |
|---|---|---|
| North | BUTTON_1 | Move north |
| West | BUTTON_2 | Move west |
| South | BUTTON_3 | Move south |
| East | BUTTON_4 | Move east |
| North + West | BUTTON_5 | Move North-West |
| South + West | BUTTON_6 | Move South-West |
| South + East | BUTTON_7 | Move South-East |
| North + East | BUTTON_8 | Move North-East |
| Shift + North | BUTTON_9 | Sidereal speed |
| Shift + West | BUTTON_10 | Unpark |
| Shift + South | BUTTON_11 | Emergency stop |
| Shift + East | BUTTON_12 | Unassigned/free |
| Slider in topmost position | BUTTON_13 | Speed 1 |
| Slider in second position | BUTTON_14 | Speed 2 |
| Slider in third position | BUTTON_15 | Speed 3 |
| Slider in position bottom-most position | BUTTON_16 | Speed 4 |
Hardware

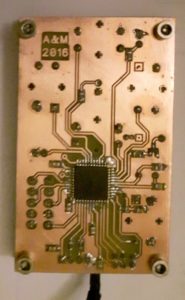 We built our joystick based on Matthew Heironimus’s “USB Joystick” library for Arduino Leonardo. We made the initial tests on a real Arduino Leonardo but for the final product we designed and built a custom board that allowed us to build a very compact and handy device.
We bought the components to build our joystick from online sellers like www.aliexpress.com, on ebay or local stores. The PCB was home made with pre-coated photoresist board that we exposed, etched and drilled.
If you are not familiar with PCB etching and SMD components mouting, you can build this joystick with a standard Arduino Leonardo, the buttons, the slider and a few other components. You’ll end up with a functional joystick, just a bit less compact.
You can find the PDF schematic here, while the file to build the PCB can be find here.
Both the schematic and the PCB files have been made with the free version of the DipTrace cad (that you can download from here: www.diptrace.com)
Software
We started from the library written by Matthew Heironimus (that you can find here: https://github.com/MHeironimus/ArduinoJoystickLibrary). Starting from an example, we added some functions like speed change, keyboard lock after some idle time (to avoid unwanted key presses), 2 leds to be able to see the keypad in the dark and a buzzer to make a few sounds.
Since we have build our custom PCB and mounted a blank ATMega32U4 processor, we had to use the Atmel programmer to do the first programming. Then we installed the Arduino bootloader and made all the remaining develompment using the standard Arduino tools.
This is the Arduino Sketch that requires the Arduino IDE version 1.6.6 or later to be compiled because of the HID library (that was not present in previous versions).